
A description of how I built my website using ReactJS, hosted for free on Netlify with blog posts being pulled from the ButterCMS API
During my week off, i decided rather than basking in the unusually high temperatures, I'd learn something new. I'm always interested in learning new languages and frameworks and keeping up to date with what's going on in the Web Development world.
I grabbed and went with the first thing that came to my head which was ReactJS. In coming up with a project, i decided to build a website for myself which would be a place where i could blog new things that i learn and play with different libraries and new technologies.
Pretty much after googling "Create a React App", Low and behold Facebook Developers had built a tool ( https://github.com/facebook/create-react-app ) called "create-react-app" which gives newbies like myself a massive head start in building React Applications. To get started i just needed to have nodeJS downloaded to my machine in particular to get access to "npm" which is a node packet manager.
Once downloaded, simply open up a command prompt window and run the following commands;
- npm install -g create-react-app
- create-react-app my-super-app
- npm start
Once done, your localhost will automatically open on localhost:3000 and you will have just successfully created your first react app which is pretty neat. No need to worry about Bable in converting the JSX code to JS or webpack to bundle all the files. This boiler plate does pretty much everything.
From watching youtube videos, many people recommended using Atom for the Text Editor when building react applications. Visual Studio Code was another which popped up in later tutorials but i was too far down the Atom trail at that point.
Shown is the main entry point into the app - App.js
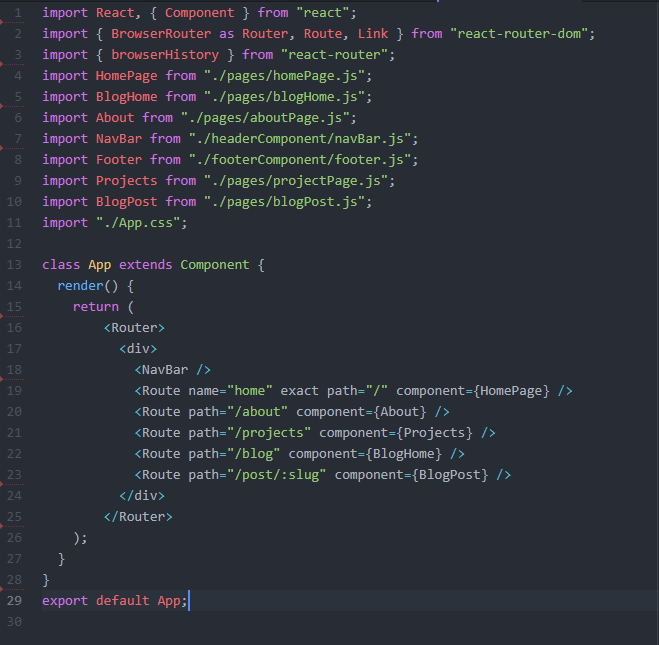
One of my requirements for this project was to be able to navigate between pages without refreshing the page. I installed React Router Dom using npm which gave me access to a Router component and a Route component and essentially as shown, if for example, the url goes to "/about", react will call the "About" component. Likewise, if the route changes to "/projects" to component called will be "Projects". Each of these components are imported at the top of the document.
Components are essentially small, reusable pieces of code similar to functions in PHP for example which will just return a block of code to be placed on screen. Similar to PHP which accepts arguments, components can also accept what's known as Props.
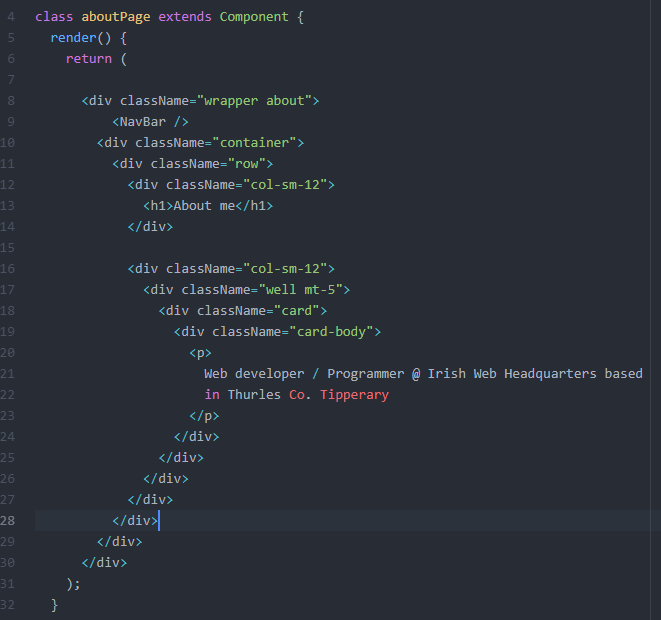
Taking a look into for example the about page. To define a component, you start with Class [name of component] extends Component. Once we've done this, we have access to the Render function. Every react component must have a render function. One would assume the above "HTML" is HTML but it's not. It's html-like code known as JSX which is how React adds XML Syntax to javascript. Everything here looks similar to HTML apart from className. Class is a reserved word in JavaScript. JSX is compiled to JavaScript at run time. I could possibly talk all day about the other cool ready made components react has that i used such as "react-burger-menu" which is the burger menu on the top left of your screen, "react-animated-css" which is what's making the cards flow into view and many more. Instead, check out this project on my GitHub to find out more https://github.com/paulmackey/React-Project
DOMAIN
I wanted this project to be on the web as cheap as possible so i bought a domain for €8 and then researched how i could get this online. I initially came across https://www.heroku.com/ which is a cloud application platform. I did get this site up but as i was using a free package, i had a limit of a certain number of Dyno hours per month. The site would stop using Dyno hours after a half hour of inactivity and then once it receives a web request, it would "wake up" and so on. I didn't like this limit so kept researching.
I then came across https://www.netlify.com/ who are currently hosting this site for free. I was up in running in about 5 minutes. All i had to do was sign up, connect my GitHub account and that was it. I was giving paulmackey.netlify.com.
I then just added a custom domain within netlify, added the name server names to blacknight and paulmackey.ie was set up in about 2 hours. It's all fully synced to my GitHub account so whenever i'm happy locally, then i just push to github and the site updates automagically.
BLOGGING
I then wanted to go further and incorporate a blogging system. All the projects on this site are stored in a JSON file which i pull in but i didn't want to do something like this for blog posts. I then came across https://buttercms.com/ which is what's known as an API Based CMS. I'm currently writing this blog post in ButterCMS. Once i hit save and visit the blog page on my site, an API Request is carried out and a JSON resultset of blog posts is received that i simply iterate through in my Blog Page component.
Furthermore, the frontend of the site is built using the popular mobile first BootStrap 4 framework.
In conclusion, it was exciting to start off on just simply getting familiar with ReactJS and all of a sudden being immersed in all these open source free technologies and connecting everything together to make this free, fast, custom built website that i can modify and bring forward all the while documenting my experience and hopefully helping someone else do the same along the way.